IT Inspired Christmas Guide 2023:
1. Cookies Always Accepted
For this festive season, let's make an exception and accept all cookies - whether virtual or the biscuits under the tree.
2. Hotfixing with Mulled Wine
Hotfixing with Mulled Wine - If you encounter a bug in your Christmas tree, fear not - a hotfix will be underway in no time with a mug of mulled wine in hand.
3. Dinner with All Stakeholders
Let's invite all stakeholders to the table - from developers and testers to users - to share Christmas Eve joys together.
4. Agile Decoration Planning
Approach to decorating the tree? Of course, Agile! One iteration each day, retrospectives, and improving decorating techniques for an optimal result.
Recipes for Great Christmas Cookies
Linzer Tart Cookies
There are no nuts in these buttery Linzer Tart cookies (Linecké Koláčky)! They have a lovely hint of lemon and a burst of delicious jelly/preserves goodness. I love these so much with raspberry or red currant preserves, but other flavors would work, too. I buy the highest quality preserves available. These are less crunchy and more melt-in-your mouth than other Linzer cookies. They hold up well. I sometimes make a double batch because these are my personal favorite Christmas cookies.
Linzer Tart Cookie Dough Ingredients:
- 1 cup plus 3 Tbs (280 grams),
- unsalted butter, softened 5 ounces (140 grams) confectioner’s sugar
- One 0.32 ounce (9 grams) packet vanilla sugar, i.e. “Dr. Oetker” brand (OR, 1 ½ tsp vanilla extract plus an extra 2 Tablespoons confectioner’s sugar)
- 2 egg yolks (from large eggs)
- ½ teaspoon lemon zest, packed
- 15 ounces (420 grams) smooth flour (hladká mouka) or unbleached pastry flour (i.e. Bob’s Red Mill in the US), sifted
- Pinch salt
[Plus, jelly/preserves filling and confectioner’s sugar dusting at end.]
Preparation Instructions:
In a large mixing bowl, beat together the softened butter, sugar(s), yolks, and lemon zest until light and fluffy, with a mixer (about 5 mins at high speed). If using extract instead of vanilla sugar, beat that just afterwards with the extra confectioner’s sugar. Then in about four stages, beat in the flour and salt. The dough may appear to be in several clumps.
With lightly floured hands, create a ball of soft dough out of the clumps. Divide the dough in half and pat each half into a disk shape. Wrap each in plastic wrap, and refrigerate until firm. About 1 hour.
On a lightly floured surface, roll one disc of dough out to about ½ centimeter thick (just under ¼ inch). Using cookie cutter(s), cut out cookies. If creating top cookies with holes, be sure their numbers equal the bottom cookie coordinating numbers. Transfer shapes to a parchment-lined baking sheet. Gather the scrap dough, roll, and repeat or refrigerate while you work the rolling/cutting process with the next disk. After all cookie cutouts are on the baking sheets, place baking sheets in the refrigerator (or other cool place) for 30 minutes for the dough to chill a bit again.
Preheat the oven to 350°F (175°C). Bake the cookies for 8 to 10 minutes, or until the edges are just beginning to turn brown. Check on them. Let them cool for 5 minutes out of the oven, on the pan, then transfer to a cooling rack to cool completely. Put the cookie tops separately from the cookie bottoms.
There are no nuts in these buttery Linzer Tart cookies (Linecké Koláčky)! They have a lovely hint of lemon and a burst of delicious jelly/preserves goodness. I love these so much with raspberry or red currant preserves, but other flavors would work, too. I buy the highest quality preserves available. These are less crunchy and more melt-in-your mouth than other Linzer cookies. They hold up well. I sometimes make a double batch because these are my personal favorite Christmas cookies.
Sift confectioners’ sugar over the cooled cookie tops. [I usually put paper under them to catch the excess sugar.] Then, turn the remaining bottom cookies flat-side up and spread a thin layer of jelly/preserves, or other filling, over it, leaving some space around perimeters, so the filling won’t ooze out when the top cookies are put in place. Top each with the sugar-dusted top cookies.
Filling ideas: Fruit preserves or jelly is the traditional filling for Linzer tart cookies, though you can use different types of fillings (i.e. Nutella or lemon curd). Raspberry and red currant preserves are my favorites. Be sure to use high quality fillings. Bon Maman brand preserves are excellent. Filled completed cookies can be decorated further with icings or melted chocolate, or other things, if you preferred not to dust with confectioner’s sugar. Put cookies in a cool place, at least until the jelly/preserves set.
Yields: Varies depending on cookie cutout size/shape. Czechs usually make small cookies that are one or two bites in size.
Vanilla Crescents
This popular buttery vanilla and nut cookie is enjoyed throughout much of Central Europe. These taste great the first day, and even better as they age. I always make plenty! They are my husband’s favorite cookie. My mother-in-law used roasted hazelnuts, which is also my usual choice, but other types of nuts could also be used. The pictured cookies are smaller than they may appear. I consider them a two-bite cookie, while my husband eats them in one.
Vanilla Crescents Ingredients:
- 155 grams (5.5 oz OR, 11 Tbs) butter, softened
- 50 grams (1.8 oz OR, 1/3 cup plus 2 Tbs) confectioner’s sugar
- 1 large egg yolk
- 1 small packet (8 or 9 g) of powdery vanilla sugar (i.e. Dr. Oetker’s) OR, 1 ½ tsp vanilla extract
- ½ tsp salt
- 210 grams smooth flour (hladká mouka) or scant 1 ½ cups all-purpose flour (in the US)
- 100 grams very finely chopped (ground) filberts/hazelnuts or skin-on/off almonds (highly recommend roasted filberts/hazelnuts)
- For dusting: 1 packet more of vanilla sugar (8 or 9 g) mixed with 150 g (1 cup) confectioner’s sugar
Preparation Instructions:
Roasted hazelnuts are available at some stores. If you choose to roast raw (optional), remove excess skin after roasting. Some skin is fine. Cream the softened butter and sugar together at medium speed with a mixer until light and fluffy. Beat in the egg yolk and vanilla sugar (or vanilla extract), and salt. Then beat in the flour ½ cup at a time. Add very finely chopped/ground nuts, continuing to beat until the mixture becomes a slightly stiff dough. [Note: The food processor “S” blade or nut grinder does a great job of grinding the nuts.]
Cover the dough with plastic wrap, and let it chill in the refrigerator for about 40 to 60 minutes.
Preheat the oven to 175°C (350°F). Form small pieces of dough into crescent shapes on a parchment paper-lined cookie sheet. Bake 15-20 mins or until just golden brown on the edges. They enlarge slightly as they bake. Do keep that in mind. Cool until only slightly warm. Not hot.
While still slightly warm, gently roll in (or dust with) confectioner’s sugar/vanilla sugar mixture on a plate, shaking off excess. Put on cooling racks to cool completely. [I usually put paper under the racks to catch extra sugar.] Do not pile on top of each other.
When cookies are thoroughly cool, gently roll them a second time in the sugar mixture (or lightly dust with sifter) and then store in an airtight container. These will keep for several weeks. They even improve with age.
Makes 60 to 72 cookies, depending on size preference.
Farmers cheese Christmas Bread
This farmers cheese version of vanočká has all of the same flavors and shape as the traditional one above. However, it does not contain yeast. Rather it uses baking powder and other leavening agents, yet the finished loaf is equal in size and perhaps even a bit more tender. It’s quicker to make than version 1, requiring less than 2 hours from start to finish. Having the right farmers cheese is crucial. It’s available in some grocery stores in the US, or can be found online or in Polish goods shops.
Ingredients:
- 40 to 42 grams fresh yeast (OR, 14 to 16 grams active dried yeast – usually two packets total)
- 1 teaspoon white sugar (for yeast activating)
- 200 grams warm milk or light cream (between 105-115°F or 41-46°C)
- 500 grams hladká mouka (OR, unbleached pastry flour i.e. Bob’s Red Mill brand), sifted
- 50 grams white sugar (for within dough)
- 20 grams granulated-vanilla sugar (OR, you could use 1 ½ tsp vanilla extract, but add it with the wet ingredients, along with perhaps 20 g extra sugar)
- 1 teaspoon salt
- Zest from 1 medium or large lemon
- 2 egg yolks from large eggs
- 100 grams unsalted butter, melted
- 40 grams blanched almonds, chopped
- 40 grams raisins (or mix of raisins and dried cranberries), soaked in rum or warm water (eventually drained)
For egg wash and decorations:
- 1 beaten large egg, as egg wash
- Almonds (slices, slivers or blanched skinned whole)
- Optional: dusting of confectioner’s sugar
Procedures:
In a small bowl, soak the raisins in rum or warm water. Set aside.
In a medium-sized bowl, add the yeast, 1 tsp sugar and the warm (not hot) milk. Put in a warm place for about 15 minutes. This becomes the activated yeast mixture.
[Tip: In absence of a warm spot, create one by putting a pan of hot water on the bottom of a cold oven with the bowl on a rack above. Do not turn on the oven!]
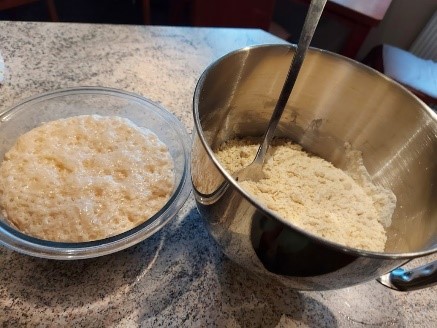
The bowl on the left has the activated yeast mixture.
In a large bowl (I use my KitchenAid mixer bowl), whisk together the sifted flour, 50 grams sugar, salt, vanilla sugar (if using), and lemon zest. Then roughly add in the egg yolks. Then add in melted butter, and then the activated yeast mix until not quite fully incorporated (dough may still look slightly shaggy). At this point, add in the chopped almonds and drained raisins (the soaking liquid is not used). Mix in ingredients with your hands to a light dough. It will be sticky, but if extremely so, you can add a teeny bit more flour. I do the kneading in my KitchenAid mixer for about 10 minutes with the dough attachment, but it can be done by hand for a touch longer.
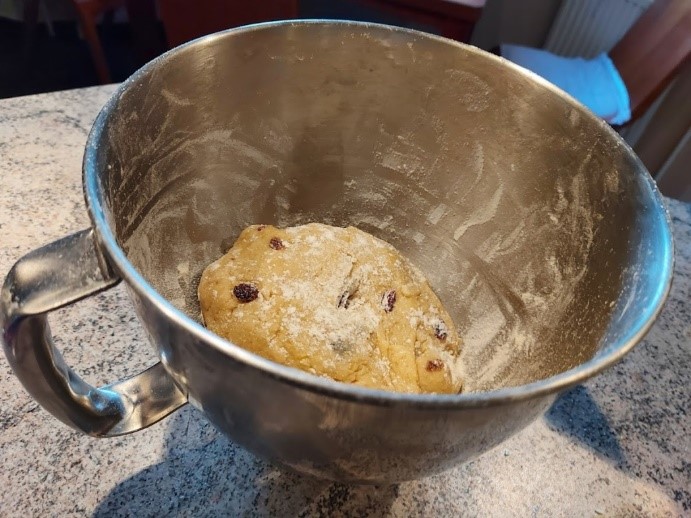
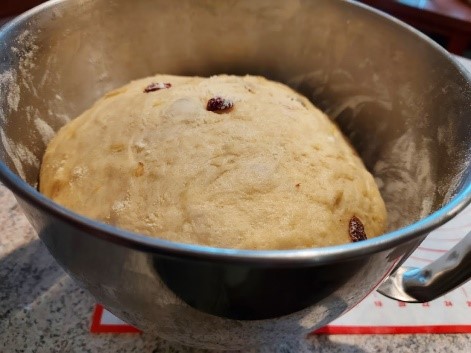
First rise: Sprinkle a small amount of additional flour under the dough, in the bowl, and a bit up the sides of the bowl. Then sprinkle a light dusting on top of the dough. Cover the bowl with a light tea towel and let rise in a warm place (see tip further above) for about 2 hours, almost doubling in size. In the emptied raisin bowl, beat the full egg to use as an egg wash. Set aside.
Remove the risen dough onto a floured work surface and slightly flatten. With a big knife or pastry cutter, cut the dough into two pieces so one part is 60% and the other 40%. Then gently shape both pieces into the shape of large knedlíky (cylindrical loaves), of similar thickness. Put the larger one aside. Then divide the smaller dough loaf into 4 equal-sized pieces. Set aside. Take the larger loaf and divide into 5 equal-sized pieces. Set aside. This gives you 9 pieces total.
Line a long baking sheet with parchment paper and set aside.
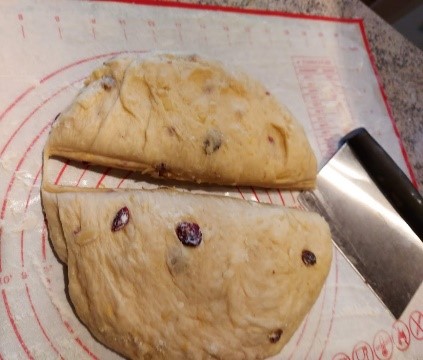
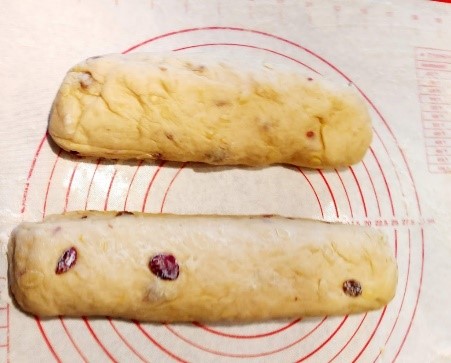
Making the 9 pieces into ropes: First, on a lightly floured surface, take two (2) of the prepared dough pieces (the biggest two, if bigger than the rest), then roll each into thin equal-length and diameter ropes, approximately 44 cm (17 inches) long. Put aside. Then take four (4) pieces and roll them into approximately 36 cm (14 inches) long ropes. Set aside. Repeat with the last three (3) pieces, only making them approximately 31 cm (12 inches) long. Put all aside to make space on your work surface.
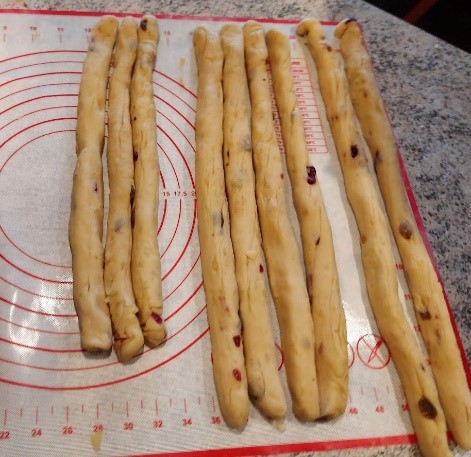
Braiding and Assembling the Vanocka
For a helpful video showing the braiding process, click here. Note that the video author is not affiliated with my blog, and her recipe is not a farmers cheese version. I hope that my written description below is sufficiently instructive. Take the braiding step very slowly, at first. The bottom braid is the trickiest.
Bottom Braid: Take the second-longest group of four (4) “ropes” and line up vertically in front of you on work surface. Press the very top parts of the ropes together. You now start the braid of the bottom section of the vánočka, as follows:
- Middle – Pick up the rope that is second to the left (in the middle) and braid over (not under) the one to its right (3rd rope over), braiding somewhat tightly. Then,
- Left – Pick up the rope that is furthest to the left and braid over the one that is right next to it (the former 3rd rope). Then,
- Right – Pick up the rope that is furthest to the right (4th rope) and braid over the one that is immediately to its left. Then,
- Middle – Follow step # 1 with the equivalent in the “new” second to the left middle piece. Then Left step # 2 with the equivalent in the “new” piece in that position. Then Right step # 3.
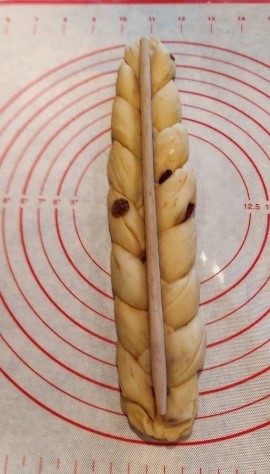
- Continue repeating the steps above until there is no more dough to braid. Then squeeze all of the bottom ends together, and again the top, if necessary. Then, press the whole braid down to slightly flatten (make wider). This ensures that this bottom layer is sufficiently bigger than the second/middle layer you’ll make further below.
- With the side of your hand or a thin spatula handle, press a long ditch down the middle of the length of the braid.
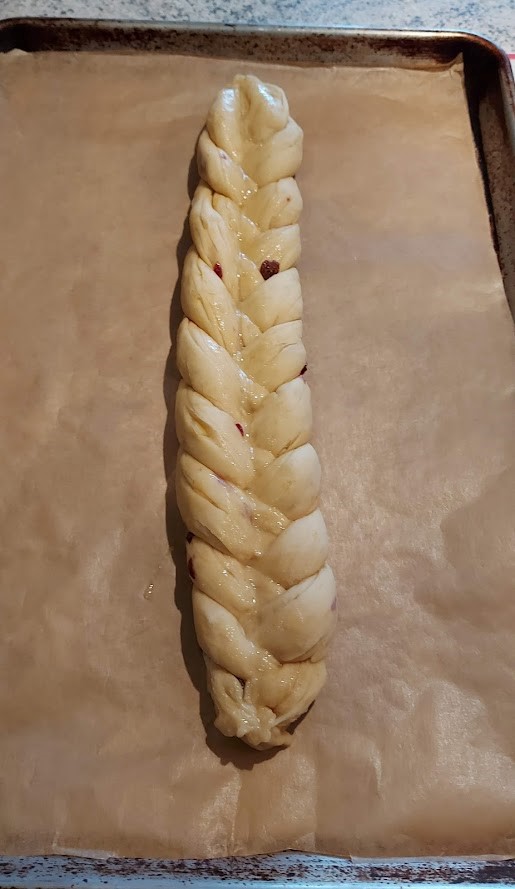
- Carefully move the whole assembled braid onto the parchment-lined baking sheet. Again, slightly fix any ends of the braid that loosen.
- Brush some of the egg wash onto the top of the braid, concentrating on the ditch part and a little to the sides of the ditch. Set the baking sheet aside.
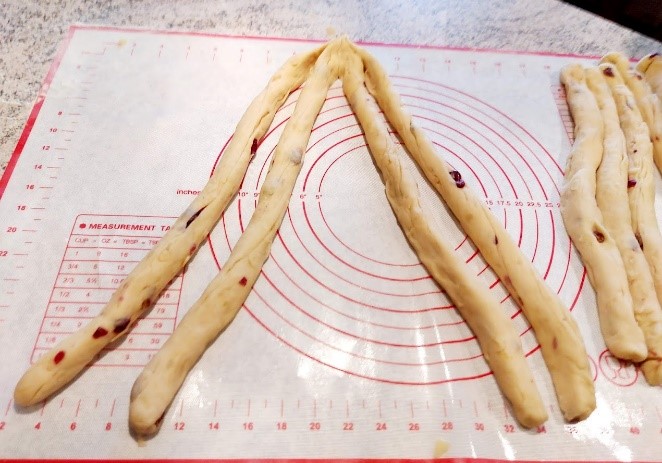
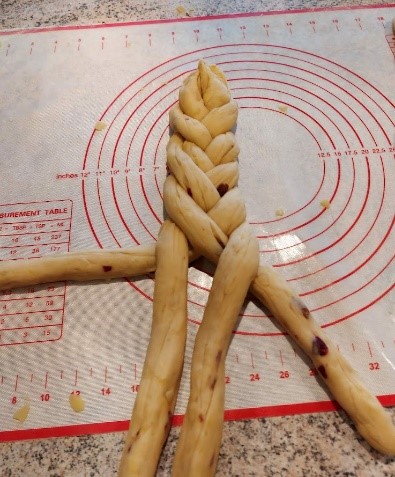
Middle Braid:
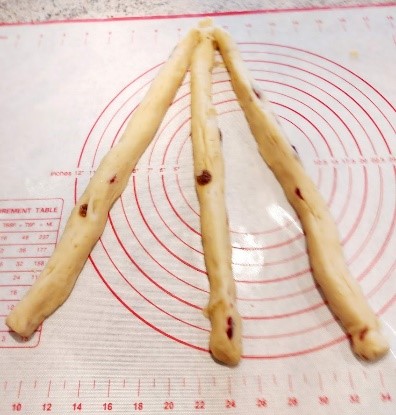
Now, do the braiding of the middle part of the vánočka on the work surface. To do this, take the three (3) shortest but equal-sized pieces. Squeeze together the tops of the three braids. Braid like a standard hair braid (pig tail) that goes Left piece over middle-Right piece over middle-Left piece over middle- Right piece over middle, etc., until the braid is finished. Squeeze the ends together. Again, put a ditch down the length of this braid, then carefully center it on top of the bottom-most braid. This new middle braid will be slightly shorter than the bottom braid. Then, lightly brush middle braid ditch area with egg wash.
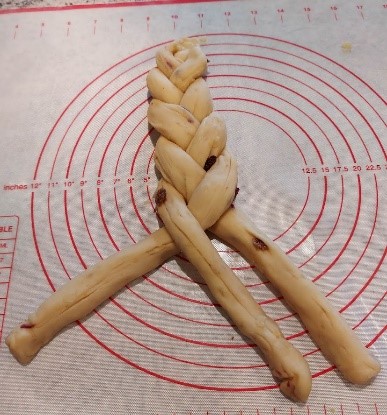
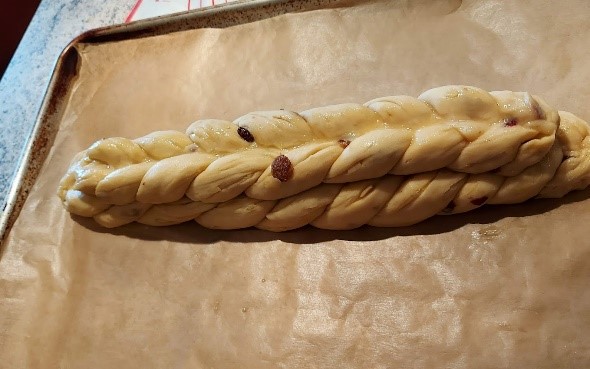
The picture in the lower-right (above) shows the finished middle-layer braid centered on the egg washed bottom layer braid.
Top Braid:
Now for the top part. Take the remaining two (2) ropes (longest of them all) and line them up for a twist. Again, squeeze together tops. Start twist of one piece over the other, until you reach the bottom. Tighten the twist a little before squeezing the ends together. This should be long enough to lie on top of the vánočka, again vertically, with the ends reaching slightly underneath the bottom-most braid. Position atop the middle of the second braid layer and lightly tuck under the bottom braid layer. Beautify as needed. DO NOT BRUSH WITH EGG WASH AT THIS POINT.
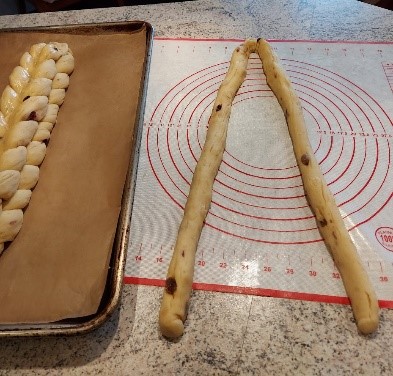
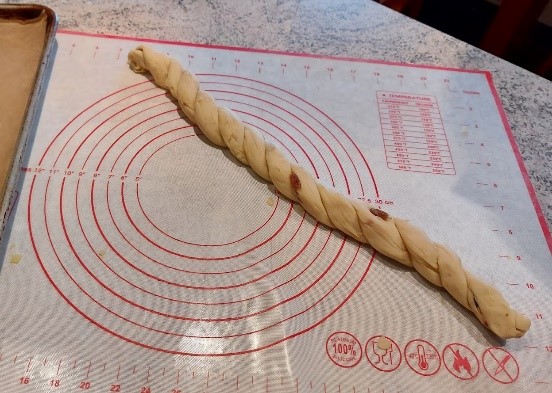
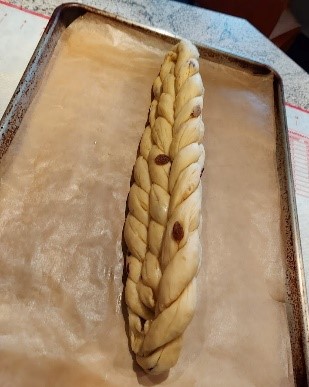
You simply create a twist of the two longest dough “ropes” (see bottom-left photo). Then place twist centered on top of the stacked braids and tuck long ends under the whole of the vánočka, and squeeze a little to secure.
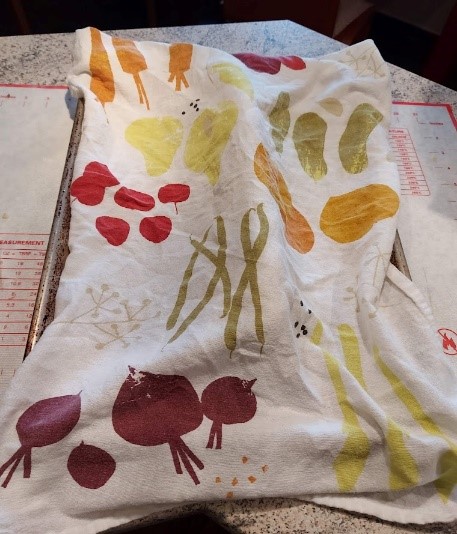
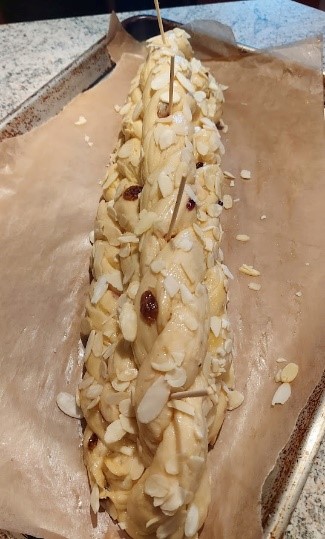
Final rise: Cover the vánočka with a light tea towel. Let rise for about 1 more hour in a warm place, then return to work area. Preheat the oven to 325° F (160° C). Gently brush the entire top of the risen vánočka with egg wash. Then sprinkle top and sides with sliced or slivered almonds. If using whole blanched almonds for the decoration, you’ll need to gently push them onto the dough, then do the egg wash. Otherwise, the heavier almond pieces may be prone to falling off. [Note: I prefer sliced or slivered for the top decoration for this version.]
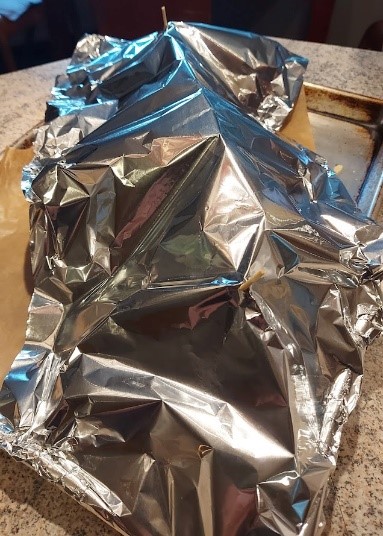
Find four (4) medium-length (~12 cm) skewers (metal or wooden) long enough to go through most of the height of the vánočka with the skewer tops sticking out a bit. Space them evenly through the top layer of the vánočka. To avoid visible holes, put the skewers in the folds of the twist. The skewers help prevent layers from breaking apart during the baking. If a layer is leaning too far to one side (crooked), this is the time to gently correct it. When ready to go, tent the entire top with aluminum foil, avoiding touching the dough. [Foil can rest on skewer tops.]
Baking the Vánočka
Put the vánočka in the 325°F (160°C) oven and bake for about 45 minutes with the foil on. Then, remove foil and bake an additional 5 minutes, or until nicely browned. Test doneness with long skewer. If needed, bake a little longer, covering again with foil, only if necessary. When done, remove from oven and transfer (on parchment paper) to a cooling rack to cool completely. Remove skewers. Dust with confectioner’s sugar, if desired.
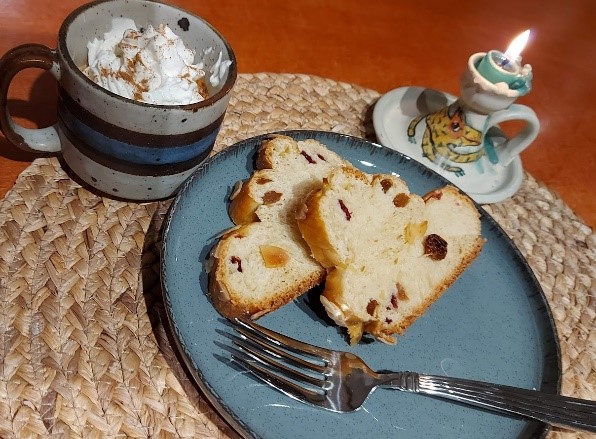
Slice and enjoy!
To keep fresh, cover the vánočka with foil or plastic wrap to prevent getting stale.
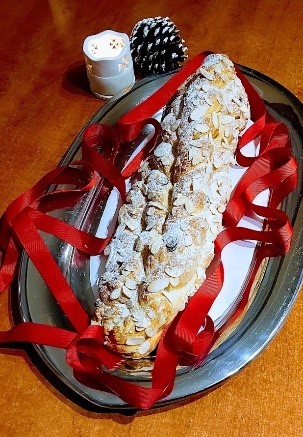
Recipe to accept all cookies
Indulge in the joy of the holiday season with our versatile cookie recipe. These cookies not only promise a delightful taste but also provide a canvas for various festive messages. Customize them with your favorite flavors like vanilla, cocoa, cinnamon, or lemon zest, creating treats that are perfect for sharing warm moments during Christmas.
Ingredients:
- 30 g all-purpose flour
- 150 g butter
- 2 eggs
- 120 g powdered sugar
- 15 g vanilla sugar
- (Our tip: Add flavorings such as aroma, cocoa, cinnamon, or lemon zest to create different cookies each time.)
Instructions:
- Mix all the ingredients together.
- Let the dough chill in the refrigerator for at least 60 minutes.
- Dust the surface of the dough and cookie cutters with flour to prevent sticking.
- If the dough becomes sticky, refrigerate it for a while.
- For better visibility of details, dust the cookie cutter with cocoa, then press it into the dough.
- Place the cut-out cookies on a baking sheet and refrigerate for an additional 30 minutes.
- Remove from the refrigerator and immediately place in a preheated oven at approximately 180 degrees Celsius for 11-14 minutes.
Wasp Nests or Bee Hive Cookies
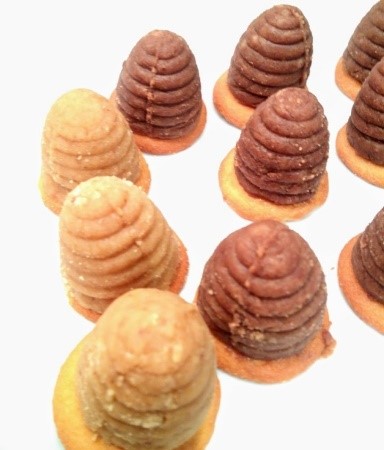
Vosi Hnizda are cute no-bake rum eggnog filled 3-dimensional cookies. The traditional version includes a nut-based dough for the “nest” or “hive” part, though people with nut allergies can find no-nut versions online, elsewhere. My mother-in-law made them without cocoa (resembling a bee hive more and highlighting the nuts), but those who like cocoa, can add it. They are traditionally filled with a rum-flavored eggnog, but other flavors and fillings can be used. The cookie dough and base include wafer-like vanilla sponge cookies. The base is a whole cookie and holds the eggnog in. Some people get extra creative and dip them in chocolate. They could even be decorated to look like a Christmas tree.
Ingredients:
Dough (nut-based)
- 150 g (5.3 oz) confectioner’s sugar
- 100 g (3.5 oz) unsalted butter, softened
- 1 egg yolk (from pasteurized egg, if raw egg worries you)
- 2 to 4 Tbs rum (or other appropriate sweet liquor), to taste
- 1/2 package (4 to 4.5 g) vanilla sugar OR, 1 teaspoon vanilla extract
- 110 g (4 oz) finely ground nuts (usually walnuts)
- 250 g (8.8 oz), or more, sponge biscuits (i.e. Nilla vanilla wafers), finely ground
- Optional: 2 Tbs unsweetened quality cocoa (if you prefer a dark style)
Rum Eggnog Filling
- 1 cup of your favorite plain high-quality store-bought thick-style eggnog
- ½ tsp vanilla extract (if not in the eggnog)
- Rum (or other appropriate sweet liquor), to taste – Start with 1 to 2 Tbs
OR,
- Eggnog that already has rum or other flavoring (found in some liquor stores)
OR,
Your choice of flavored pipeable whipped cream or custard
Other Recipe Elements
- Sponge biscuits/vanilla wafers for cookie bases (should fully cover cookie bottom to keep eggnog in)
- Optional: Confectioner’s sugar, melted chocolate, and/or other decorations
Preparation Instructions:
Making the dough
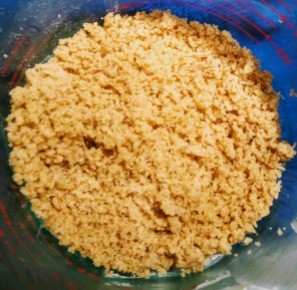
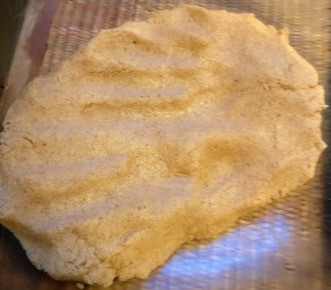
Cream together the confectioner’s sugar, yolk, and butter, then add the rum and extract (or vanilla sugar). In another bowl, combine the ground nuts, biscuits/wafers, and optional cocoa (if using). [I use my food processor for the grinding.] Add this dry mixture to the wet mixture, to form a dough. If the dough sticks to your hands, add more finely ground biscuits/wafers. I usually need the larger listed amount. Cover with plastic wrap and refrigerate for about 30 minutes, or longer, before molding.
Molding & filling the dough
Vosí Hnízda molds usually come in a few sizes. I prefer to use the middle size, with a base width of 1 ¾ inches (3 ½ cm) and height of 1 ½ inches (4 cm). A smaller size may need a smaller biscuit/wafer base. The largest size seems overwhelmingly big, in my view, but that’s a matter of opinion.
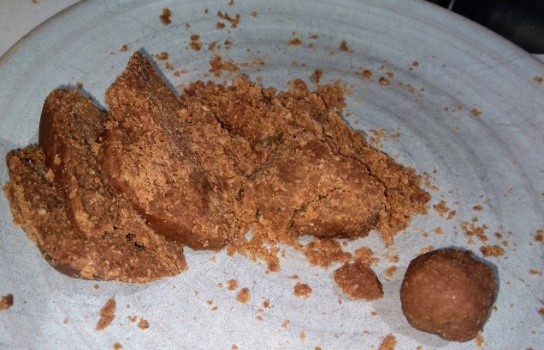
I usually slice refrigerated dough and break pieces off. It will look a little crumbly, but still pack into balls. Refrigerate half, while you work with the first half of dough.
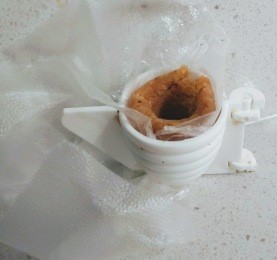
Vosí Hnízda dough very often sticks to the inside of the mold. Many recipes suggest first dusting the inside of the mold with confectioner’s sugar, but I prefer a different method that works much better for me. First, cut out a few squares of plastic wrap that are bigger than the contents of the molds. Then roll some of the dough into a ball, not quite the size of the whole mold. Put the ball of dough in the plastic square. Insert into the mold (still in the plastic wrap), then press a cavity into the center of the dough with your pinky finger or the end of a wooden spoon, pushing around a bit so there is ample space for the eggnog filling, and the dough pushes against the mold sides. Rub or cut off any excess dough from the bottom of the mold, so the base is level.
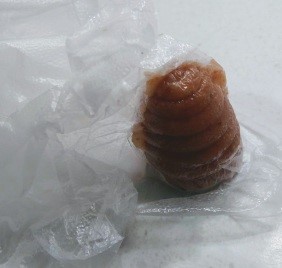
Carefully remove plastic wrapped molded dough from the mold, and then remove the plastic wrap and any stray dough bits. Be sure there are no cracks in the formed dough, or it will leak. Gently holding the molded Vosí Hnízda upside-down, fill the cavity with flavored eggnog or custard. Then center a whole vanilla biscuit/wafer (flat-side outwards) to the base, to hold the eggnog in. Carefully invert the prepared Vosí Hnízda and gently press it onto the wafer/biscuit, holding for a few seconds before placing on a platter. Repeat the whole molding/filling process with the rest of the dough, eggnog, and wafer bases. Let filled cookies set for at least a few hours before handling again. The base should then be sufficiently stuck to the cookie part. After that, if desired, dust with confectioner’s sugar or decorate with chocolate, etc. If coating with chocolate, let set/chill afterwards, for chocolate to harden.
As stated in introduction, this cookie is not baked. The raw-dough-portion will firm/dry up over time. I realize the rawness may seem odd to some. You will notice a difference after a number of hours, and days. Store in a cool place.
Return to Authentic Czech Christmas Cookies and more post
5. VPN to the North Pole
With a Virtual Private Network, you can securely share your wishlist directly to the North Pole.
6. Unlimited Cloud Storage for Memories
Upload and store an unlimited amount of beautiful Christmas memories in your personal cloud storage.
7. Smooth Recovery from Festive Excess
Our recovery strategies are in place to help us rebound from all the Christmas overindulgence and surplus.
8. Scaling Up the Joy
Ensure your joy and happiness are scalable to cover all your loved ones during the holidays and approved by all “users” in our household.
9. UX of Unwrapping Gifts
This season we focus on the UX (User Experience) of unwrapping gifts
- how can we optimize the joy and surprise for everyone opening a present?
10. Repository Full of Joy
Our repositories are filled with joy and happiness, ready to be “committed”
and “pushed” to our loved ones throughout the season.
